No edit summary |
|||
| (45 intermediate revisions by the same user not shown) | |||
| Line 1: | Line 1: | ||
{{Character Profile Model|full_name=Dravak Dalken|location=[[Crag Hudd]]|worship=[[Ariagful]]|family=*[[Infernok]] (Bonded)|race=[[Abyssal Dwarf]]|class=[[Iron-caster]]|sources=*[[Kings of War 2.3 – Edge of the Abyss|2.3 – Edge of the Abyss]] | {{Character Profile Model|full_name=Dravak Dalken|location=[[Crag Hudd]]|worship=[[Ariagful]]|family=*[[Infernok]] (Bonded)|race=[[Abyssal Dwarf]]|class=[[Iron-caster]]|sources=*[[Kings of War 2.3 – Edge of the Abyss|2.3 – Edge of the Abyss]] | ||
*[[Kings of War 3.2 - Clash of Kings 2021: Halpi’s Rift|3.2 - Clash of Kings 2021: Halpi’s Rift]]|image1=<gallery> | *[[Kings of War 3.2 - Clash of Kings 2021: Halpi’s Rift|3.2 - Clash of Kings 2021: Halpi’s Rift]] | ||
*[[Conclusion I – Talannar’s Torment]] | |||
*[[Conclusion II - Closing of the Rift]] | |||
*[[Honor's Price]] | |||
*[[Kings of War 3.6 - Clash of Kings 2025]]|image1=<gallery> | |||
Dravak_Dalken_Model.png|Model | Dravak_Dalken_Model.png|Model | ||
File:Ad1.png|Art | File:Ad1.png|Art | ||
DravikKoWStats.png|KoW | DravikKoWStats.png|KoW | ||
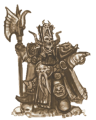
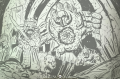
</gallery>|logo1=abyssal-dwarfs-icon.png|affiliation=[[Abyssal Dwarfs]]|model_kit=Abyssal Dwarf Ironcaster|status=Active|3rd_edition=[[:file:DravikKoWStats.png|Yes]]|store_link=[https://www.manticgames.com/kings-of-war/abyssal-dwarf/abyssal-dwarf-ironcaster/ Mantic Store]|2nd_edition=[[:file:Dravak Dalken 2nd Edition Rules.png|Yes]]}}'''Dravak | </gallery>|logo1=[[File:abyssal-dwarfs-icon.png|link=Abyssal Dwarfs|100px]]|games1={{kingsofwarlogo}}|affiliation=[[Abyssal Dwarfs]]|model_kit=Abyssal Dwarf Ironcaster|status=Active|3rd_edition=[[:file:DravikKoWStats.png|Yes]]|store_link=[https://www.manticgames.com/kings-of-war/abyssal-dwarf/abyssal-dwarf-ironcaster/ Mantic Store]|2nd_edition=[[:file:Dravak Dalken 2nd Edition Rules.png|Yes]]}}'''Dravak Dalken''' while performing a ritual to animate the slab of a [[Greater Obsidian Golem]] adding runes and whipping his [[ratkin]] slave was too busy and too consumed in his work to realise that the chittering of the [[Ratkin Slaves|Ratkin Slave]] was an incantation, and the gem the [[Ratkin]] was a different hue to the others. | ||
== About== | == About== | ||
| Line 11: | Line 15: | ||
Finding a hidden room in the [[Halpi Mountains|Halpi Mountain]], Dravak discovered a box with delicate carvings of leaves and vines, an [[Elven|elvish]] box, within the box was several scrolls in [[elven]] hand. The scrolls showed the [[Halpi Mountains]] and rivers of energy, and an [[Elven|elf]] with metallic gauntlets harnessing the power. So began the [[Abyssal Dwarfs]] quest for the [[Nexus]]. | Finding a hidden room in the [[Halpi Mountains|Halpi Mountain]], Dravak discovered a box with delicate carvings of leaves and vines, an [[Elven|elvish]] box, within the box was several scrolls in [[elven]] hand. The scrolls showed the [[Halpi Mountains]] and rivers of energy, and an [[Elven|elf]] with metallic gauntlets harnessing the power. So began the [[Abyssal Dwarfs]] quest for the [[Nexus]]. | ||
== | == Biography == | ||
===3650=== | |||
{{edgeoftheabysslogo}}Dravak was in his tower at [[Zarak]] when he noticed an abnormal raging above. Dravak knew the time was short and moved to his Laboratory. Dravak ordered his [[Ratkin]] to begin preparations on the inactive [[Greater Obsidian Golem]] in the center of the room. The Ratkin slave started to place magical runes on the golem and Dravak got a book from the shelf. | |||
Once the preparations were complete, Dravak began to chant and the runes on the golem began to glow red. The glow began to get brighter and brighter along side of Dravak's chanting getting louder to drown out the storm from outside. Dravak wrestled control of the magic being summoned, yet he could sense something wasn't right. The [[Ratkin]] slave revealed another rune, a rune of bonding from behind his back. This rune was a sickly green and is normally used to fuse a subject to another beast (creating somethign new) | |||
Dravak roared at this betrayal and was in agony as the rune started to bind Dravak to the [[Infernok|Greater Obsidian Golem]]. The [[Ratkin]] grinned and dashed out of the chamber just before Dravak blacked out. | |||
After some dreams full of horrors, Dravak woke up with his body in pain. Dravak's body felt heavy however and he began to move, noticing it was rock. Dravak looked across and saw his old body staring back at him. He moved his arm and saw his old body do the same. Dravak grinned and watched his old body grin as well. Dravak was now able to split his conscious between his body and the [[Greater Obsidian Golem]] known as [[Infernok]] | |||
===3654=== | |||
Dravak would led the [[Abyssal Dwarfs]] in the [[Invasion of the Halpi Mountains]], eventually leading to the majority of [[Free Dwarfs]] hold's falling to Abyssal Dwarfs, [[Ratkin]] and [[Goblins]] then pushing the [[Free Dwarfs]] out of the [[Halpi Mountains]]. | |||
===3865=== | |||
{{clashofkings2021}}Dravak was assigned by the Overlords to hunt down and remove the [[Free Dwarfs]] remnants after the [[Invasion of the Halpi Mountains]], mainly due to Dravak's experiments and cruelty becoming more reckless and they wanted to keep Dravak away from their cities and people. This led Dravak to [[Crag Hudd]] which was full of mineral wealth and untapped veins of magical power which was connected to conduits all over Pannithor after finding some ancient scrolls pointing to its location. | |||
====[[Halpi's Rift]]==== | |||
As [[Abyssal Dwarfs]] dug, the stronger the magical power in the veins became. It grew the Abyssal Dwarfs lust for power and pushed them to dig deeper and deeper eventually breaking into a vast network of caverns and tunnels. This connected network was currently in conflict with thousands of [[Goblins]] figthing [[Ratkin]], unknowningly fueled by the exposure of the magical veins, and now was directed at the newly arrived Abyssal Dwarfs. | |||
The [[Abyssal Dwarfs]] used their own [[Ratkin Slaves]] to push back the oncoming [[Ratkin]] forces, leading to them gaining a foothold in the network and Dravak seizing his moment. Using [[Infernok]], Dravak smashed through and routed the [[Ratkin]] and [[Goblins]] out of the tunnels, and led to many [[Abyssal Dwarfs]] to call Dravak "master" with other [[Iron-caster|Iron-casters]] falling to Dravak in the process. | |||
Dravak ordered the [[Abyssal Dwarfs]] to continue to dig down, following the rich seems of ore which was pulsating with magic. Eventually the digging machines struck something more mysterious and powerful than ore, forcing the [[Ratkin Slaves]] to flee and a blinding light to emerge from the rock. It released ethereal forms and strange after-images of entites from other magical planes, eventually coalescing in a nexus of pure energy that connected to many ley-lines across Pannithor. Dravak suspected that this source of power was so ancient that it could have originated from the creation of Pannithor. | |||
Dravak ordered for the digging to resume, with his lust for power pushing him forward regardless on how many miners are lost in the process. The magic unleashed flooded all the tunnels and caverns then blasted upward through the old holds and mountaintops, shining like a beacon that could be seen halfway around the world. Dravak was receiving images in his mind, showing glory across all planes of existence and his split soul being repaired. | |||
[[Abyssal Dwarfs]] fell back to protect Dravak as he researched the Nexus as forces were beginning to move towards the beacon including the return of the [[Ratkin]] and [[Goblins]] in the tunnels beneath [[Crag Hudd]]. Dravak used his understanding of the Nexus to attack an incoming force of [[Free Dwarfs]], leaving him exhausted. | |||
Despite Dravak's efforts, the [[Free Dwarfs]] managed to break through the outer defences of [[Crag Hudd]] in an attempt to reclaim the upper levels of the hold. This resulted in the [[Abyssal Dwarfs]] being stretched thin with [[Free Dwarfs]] up top, [[Goblins]] (led by Grupp Longnail]]) on one side of the tunnels below and [[Ratkin]] (led by [[Twitch Keenear]] on the other side, and the Abyssal Dwarfs lacked the numbers to fully engage with either. This was worsened when word got to the [[Ratkin Slaves]] about their free kin being blessed with the power of the abyss, resulting in them joining the Unshackled (free Ratkin). | |||
Dravak started to doubt his own power and own ingenuity after being told about the battles outcome, killing the [[Ratkin]] messengers in response. Dravak sent [[Infernok]] to deal with the [[Goblins]] and had lost control briefly resulting in death on both sides however he returned to his side shortly after, ensuring that Dravak had a last line of defence against anyone attempting to take the Nexus from him. He knew he had to hold on. | |||
[[ | {{TalannarsTormentlogo}}Dravak used his [[Gargoyles]] to monitor the incoming [[Northern Alliance]] force as he continued to search for a way of controlling the Nexus while other [[Abyssal Dwarfs]] prepared to take on the incoming army. On the way the [[Northern Alliance]] forces met up with allies such as [[Free Dwarfs]], [[Elves]] and [[Basileans]], the combined force managed to break through the defences of [[Crag Hudd]] and a small contingent of elven mages, Basilean wizards, dwarf stone priests and ice-queens entered the hold and reached Dravak. | ||
[[Infernok]] charged at the group as Dravak stared at them furiously and his [[Immortal Guard]] moved to protect Dravak. Dravak continued to read the latest batch of parchments and scrolls that were delivered to him which continued to mentioning the gauntlets which were needed to harnass the raw energy of the Nexus. In his anger he temporarily lost control of Infernok and felt the recoil of a blade striking Infernok's torso. He concentrated once more and swatted away the elf that was fighting Infernok and with a growl of frustration he realised his dreams of controlling the Nexus was lost. | |||
Summoning [[Infernok]] to his side once more, Dravak sent hordes of [[Ratkin]] to their doom as he scuttled back into the tunnels of [[Crag Hudd]], Infernok stomping beside him. | |||
{{ClosingoftheRiftlogo}}Dravak left the platform and vanished, along with [[Infernok]], down one of the many tunnels that led away from the Rift. Whatever Dravak was doing to control the Rift had stopped also and led to the alliance of good to seal the Rift. | |||
<br><br> | |||
====Post-Halpis Rift==== | |||
{{Honorspricelogo}} [[Alborz]], who was the current lord of [[Llyngyr Cadw]], attempted to get assistance from Dravak as the [[Daamuz Clan]] who seemingly was still based at [[Crag Hudd]]. The messaging back was indicating he was attempting to continue to tap into the rift again and was driven slightly mad by his continued attempt. | |||
<br><br><br><br> | |||
===Post-3868=== | |||
====[[The Deepwater Crusade]]==== | |||
{{clashofkings2025}} Dravak was in [[Crag Hudd]] after being defeating during the [[Halpi's Rift]] event, having had his forces heavily depleted and few in number, dreaming of a regnue that might never come. | |||
Eventually, the [[Lord of Lies]] arrived holding the [[Black Axe]] and Dravak listened to his plan after almost turning him away out of bitterness. After hearing his plan, Dravak roused his golem [[Infernok]] and the next day sailed out for [[Estacarr]], targeting a [[Riverguard]] settlement in [[Myrrhimm]] that had marched beside [[Dwarfs]] and [[Elves]] during the [[Halpi's Rift]] conflict. | |||
Along with Dravak, a cohort of [[Riftforged Orcs]] travelled with him which allowed Dravak to travel easily through towards his target. He would be counter attacked by the forces from [[Ilythish]] however his war machines plus the assistance of the Riftforged Orcs would prove vital in Dravak's efforts in [[Estacarr]]. | |||
In [[Estacarr]], the [[Dwarfs]] emptied their holds to take on the [[Riftforged Orcs]] and managed to push them back as Dravak in the South was gaining ground against the [[Riverguard]], until [[Ilyth'ul]] joined the battle. A great tidal wave carried Ilyth'ul with his army of [[Naiads]] alongside his glittering chariot and this arrival took the heart from the [[Abyssal Dwarfs]]. Dravak tried to fight on, however eventually [[Infernok]] snatched him up and they retreated back to this ships to safety. | |||
== Kings of War Appearances == | |||
* First Appearance - [[Kings of War 2.3 – Edge of the Abyss|2.3 – Edge of the Abyss]] | |||
* 3rd Edition - [[Kings of War – 3rd Edition Rulebook]] | |||
=== 2nd Edition === | |||
[[File:Dravak Dalken 2nd Edition Rules.png|left|frameless]] | |||
Able to split his conscious between his old body and the powerful body of the Greater Obsidian Golem, Dravak is a force to be feared on the battlefield. | Able to split his conscious between his old body and the powerful body of the Greater Obsidian Golem, Dravak is a force to be feared on the battlefield. | ||
<br><br><br><br><br><br><br><br><br><br> | |||
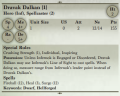
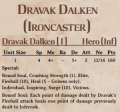
=== 3rd Edition === | === 3rd Edition === | ||
[[File:DravikKoWStats.png|center|frameless|402x402px]] | [[File:DravikKoWStats.png|center|frameless|402x402px]] | ||
==Trivia== | |||
* Dravak Dalken has often been mispelled as Dravak Dalkan (as stated in [[Kings of War 3.2 - Clash of Kings 2021: Halpi’s Rift]], page 62) and also as Draval (as stated in [[Kings of War 3.6 - Clash of Kings 2025]], page 40). These have been confirmed as typos. | |||
==Gallery== | ==Gallery== | ||
<gallery mode=nolines> | <gallery mode=nolines> | ||
Dravak_Dalken_Model.png|Dravak Dalken Model | Dravak_Dalken_Model.png|Dravak Dalken Model | ||
File:Ad1.png|Dravak | File:Ad1.png|Dravak Dalken | ||
File:DravikKoWStats.png|Dravak Dalken 3rd Edition Rules | File:DravikKoWStats.png|Dravak Dalken 3rd Edition Rules | ||
File:Dravak Dalken 2nd Edition Rules.png|Dravak Dalken 2nd Edition Rules | File:Dravak Dalken 2nd Edition Rules.png|Dravak Dalken 2nd Edition Rules | ||
File:InfernokArt.png|Dravak | File:InfernokArt.png|Dravak Dalken and Infernok Art | ||
</gallery> | </gallery> | ||
[[Category:Legends of Pannithor]] | [[Category:Legends of Pannithor]] | ||
Latest revision as of 05:41, 26 April 2025
Dravak Dalken while performing a ritual to animate the slab of a Greater Obsidian Golem adding runes and whipping his ratkin slave was too busy and too consumed in his work to realise that the chittering of the Ratkin Slave was an incantation, and the gem the Ratkin was a different hue to the others.
About
Dravak roared in agony as is life force was bonded with the Golem. Slipping into a dream of fire burning through his skin and fusing his bones. Dravak is able to see through the Golem and control the Golem as if it was his own body. Able to split his conscious between his old body and a powerful body of the Greater Obsidian Golem, Dravak is a force to be feared on the battlefield.
Finding a hidden room in the Halpi Mountain, Dravak discovered a box with delicate carvings of leaves and vines, an elvish box, within the box was several scrolls in elven hand. The scrolls showed the Halpi Mountains and rivers of energy, and an elf with metallic gauntlets harnessing the power. So began the Abyssal Dwarfs quest for the Nexus.
Biography
3650
Dravak was in his tower at Zarak when he noticed an abnormal raging above. Dravak knew the time was short and moved to his Laboratory. Dravak ordered his Ratkin to begin preparations on the inactive Greater Obsidian Golem in the center of the room. The Ratkin slave started to place magical runes on the golem and Dravak got a book from the shelf.
Once the preparations were complete, Dravak began to chant and the runes on the golem began to glow red. The glow began to get brighter and brighter along side of Dravak's chanting getting louder to drown out the storm from outside. Dravak wrestled control of the magic being summoned, yet he could sense something wasn't right. The Ratkin slave revealed another rune, a rune of bonding from behind his back. This rune was a sickly green and is normally used to fuse a subject to another beast (creating somethign new)
Dravak roared at this betrayal and was in agony as the rune started to bind Dravak to the Greater Obsidian Golem. The Ratkin grinned and dashed out of the chamber just before Dravak blacked out.
After some dreams full of horrors, Dravak woke up with his body in pain. Dravak's body felt heavy however and he began to move, noticing it was rock. Dravak looked across and saw his old body staring back at him. He moved his arm and saw his old body do the same. Dravak grinned and watched his old body grin as well. Dravak was now able to split his conscious between his body and the Greater Obsidian Golem known as Infernok
3654
Dravak would led the Abyssal Dwarfs in the Invasion of the Halpi Mountains, eventually leading to the majority of Free Dwarfs hold's falling to Abyssal Dwarfs, Ratkin and Goblins then pushing the Free Dwarfs out of the Halpi Mountains.
3865

Dravak was assigned by the Overlords to hunt down and remove the Free Dwarfs remnants after the Invasion of the Halpi Mountains, mainly due to Dravak's experiments and cruelty becoming more reckless and they wanted to keep Dravak away from their cities and people. This led Dravak to Crag Hudd which was full of mineral wealth and untapped veins of magical power which was connected to conduits all over Pannithor after finding some ancient scrolls pointing to its location.
Halpi's Rift
As Abyssal Dwarfs dug, the stronger the magical power in the veins became. It grew the Abyssal Dwarfs lust for power and pushed them to dig deeper and deeper eventually breaking into a vast network of caverns and tunnels. This connected network was currently in conflict with thousands of Goblins figthing Ratkin, unknowningly fueled by the exposure of the magical veins, and now was directed at the newly arrived Abyssal Dwarfs.
The Abyssal Dwarfs used their own Ratkin Slaves to push back the oncoming Ratkin forces, leading to them gaining a foothold in the network and Dravak seizing his moment. Using Infernok, Dravak smashed through and routed the Ratkin and Goblins out of the tunnels, and led to many Abyssal Dwarfs to call Dravak "master" with other Iron-casters falling to Dravak in the process.
Dravak ordered the Abyssal Dwarfs to continue to dig down, following the rich seems of ore which was pulsating with magic. Eventually the digging machines struck something more mysterious and powerful than ore, forcing the Ratkin Slaves to flee and a blinding light to emerge from the rock. It released ethereal forms and strange after-images of entites from other magical planes, eventually coalescing in a nexus of pure energy that connected to many ley-lines across Pannithor. Dravak suspected that this source of power was so ancient that it could have originated from the creation of Pannithor.
Dravak ordered for the digging to resume, with his lust for power pushing him forward regardless on how many miners are lost in the process. The magic unleashed flooded all the tunnels and caverns then blasted upward through the old holds and mountaintops, shining like a beacon that could be seen halfway around the world. Dravak was receiving images in his mind, showing glory across all planes of existence and his split soul being repaired.
Abyssal Dwarfs fell back to protect Dravak as he researched the Nexus as forces were beginning to move towards the beacon including the return of the Ratkin and Goblins in the tunnels beneath Crag Hudd. Dravak used his understanding of the Nexus to attack an incoming force of Free Dwarfs, leaving him exhausted.
Despite Dravak's efforts, the Free Dwarfs managed to break through the outer defences of Crag Hudd in an attempt to reclaim the upper levels of the hold. This resulted in the Abyssal Dwarfs being stretched thin with Free Dwarfs up top, Goblins (led by Grupp Longnail]]) on one side of the tunnels below and Ratkin (led by Twitch Keenear on the other side, and the Abyssal Dwarfs lacked the numbers to fully engage with either. This was worsened when word got to the Ratkin Slaves about their free kin being blessed with the power of the abyss, resulting in them joining the Unshackled (free Ratkin).
Dravak started to doubt his own power and own ingenuity after being told about the battles outcome, killing the Ratkin messengers in response. Dravak sent Infernok to deal with the Goblins and had lost control briefly resulting in death on both sides however he returned to his side shortly after, ensuring that Dravak had a last line of defence against anyone attempting to take the Nexus from him. He knew he had to hold on.

Dravak used his Gargoyles to monitor the incoming Northern Alliance force as he continued to search for a way of controlling the Nexus while other Abyssal Dwarfs prepared to take on the incoming army. On the way the Northern Alliance forces met up with allies such as Free Dwarfs, Elves and Basileans, the combined force managed to break through the defences of Crag Hudd and a small contingent of elven mages, Basilean wizards, dwarf stone priests and ice-queens entered the hold and reached Dravak.
Infernok charged at the group as Dravak stared at them furiously and his Immortal Guard moved to protect Dravak. Dravak continued to read the latest batch of parchments and scrolls that were delivered to him which continued to mentioning the gauntlets which were needed to harnass the raw energy of the Nexus. In his anger he temporarily lost control of Infernok and felt the recoil of a blade striking Infernok's torso. He concentrated once more and swatted away the elf that was fighting Infernok and with a growl of frustration he realised his dreams of controlling the Nexus was lost.
Summoning Infernok to his side once more, Dravak sent hordes of Ratkin to their doom as he scuttled back into the tunnels of Crag Hudd, Infernok stomping beside him.

Dravak left the platform and vanished, along with Infernok, down one of the many tunnels that led away from the Rift. Whatever Dravak was doing to control the Rift had stopped also and led to the alliance of good to seal the Rift.
Post-Halpis Rift
Alborz, who was the current lord of Llyngyr Cadw, attempted to get assistance from Dravak as the Daamuz Clan who seemingly was still based at Crag Hudd. The messaging back was indicating he was attempting to continue to tap into the rift again and was driven slightly mad by his continued attempt.
Post-3868
The Deepwater Crusade

Dravak was in Crag Hudd after being defeating during the Halpi's Rift event, having had his forces heavily depleted and few in number, dreaming of a regnue that might never come.
Eventually, the Lord of Lies arrived holding the Black Axe and Dravak listened to his plan after almost turning him away out of bitterness. After hearing his plan, Dravak roused his golem Infernok and the next day sailed out for Estacarr, targeting a Riverguard settlement in Myrrhimm that had marched beside Dwarfs and Elves during the Halpi's Rift conflict.
Along with Dravak, a cohort of Riftforged Orcs travelled with him which allowed Dravak to travel easily through towards his target. He would be counter attacked by the forces from Ilythish however his war machines plus the assistance of the Riftforged Orcs would prove vital in Dravak's efforts in Estacarr.
In Estacarr, the Dwarfs emptied their holds to take on the Riftforged Orcs and managed to push them back as Dravak in the South was gaining ground against the Riverguard, until Ilyth'ul joined the battle. A great tidal wave carried Ilyth'ul with his army of Naiads alongside his glittering chariot and this arrival took the heart from the Abyssal Dwarfs. Dravak tried to fight on, however eventually Infernok snatched him up and they retreated back to this ships to safety.
Kings of War Appearances
- First Appearance - 2.3 – Edge of the Abyss
- 3rd Edition - Kings of War – 3rd Edition Rulebook
2nd Edition

Able to split his conscious between his old body and the powerful body of the Greater Obsidian Golem, Dravak is a force to be feared on the battlefield.
3rd Edition

Trivia
- Dravak Dalken has often been mispelled as Dravak Dalkan (as stated in Kings of War 3.2 - Clash of Kings 2021: Halpi’s Rift, page 62) and also as Draval (as stated in Kings of War 3.6 - Clash of Kings 2025, page 40). These have been confirmed as typos.
Gallery
-
 Dravak Dalken Model
 -
 Dravak Dalken
 -
 Dravak Dalken 3rd Edition Rules
 -
 Dravak Dalken 2nd Edition Rules
 -
 Dravak Dalken and Infernok Art


 This wiki is not an official Mantic Games publication. |